Filtering For Mac
WebChaver currently offers a filter for the Mac. Additionally, Mac’s built-in parental controls work well in conjunction with WebChaver. This guide will help you set up Parental Controls on your Mac to help you control and monitor a user’s access to the Internet and the computer.
There are a few important things to remember:
- This guide to Mac Parental Controls only pertains to OS X 10.5.x and newer. Parental Controls are available on older versions of the Mac OS but are more difficult to set up.
- To set up and manage Mac Parental Controls, you will need to have a Managed Account (or a secondary user account) on the computer for the person being filtered. In other words, the administrator cannot set up Parental Controls for himself.
- Statistics show that some filters fail to block as much as 30% of inappropriate and even pornographic sites. The stronger keyword filters (that tend to slow down connections considerably) still miss as much as 5% of inappropriate sites (equivelant to millions of websites).
- You will need to either be an Administrator on the computer or have the Administrator password in order to set up and manage the Parental Controls.
Setting Up Parental Controls
-
To begin, click on the Apple icon in the top left corner of your screen and select System Preferences. When the System Preferences menu comes up, click the Parental Controls icon in the System row.
 Step 1 - Select "Parental Controls" under "System Preferences"
-
The Parental Controls preferences window will open. To maintain security on this window, you will need to click on the lock in the lower left corner of the screen and enter the administrator password. Once you have entered the password, click OK.
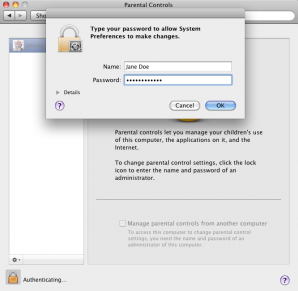 Step 2 - Log in to get access to parental controls
-
To start making changes to the controls, select the username you wish to modify. If you don’t have any other users on your computer, you will be shown the “Open Accounts Preferences…” button. Click there to create new usernames. Once you’ve created a new username, select the name of the account for which you will set up Parental Controls from the list on the left. Then check the boxes for “Allow guests to log in to this computer,” and “Enable parental controls.”
 Step 3 - Select the user whose account you wish to modify
-
Click on the “Open Parental Controls…” button.
-
If you’re not already on the System tab, click to open it. This section gives you access to several options for controlling access to system functions and applications. The majority of these options are purely a matter of parental preference as to whether you would like to enable them. In order to run Covenant Eyes, you will need to have “Only allow selected applications” checked.
-
Underneath “Only allow selected applications,” you may select which applications can be accessed in five different categories: iLife, Internet, Widgets, Other, and Utilities. Each category has several application and system options under them. Click the arrow to the left of the category to view the options. For the purposes of Covenant Eyes, it is important to enable at least a web browser and Covenant Eyes.
- You may choose to activate the entire Internet category. However, it may only be necessary to activate the Internet browser. (For instance, you may disable Mail and iChat.)
- Under the Other category, you will want to make sure you have selected Covenant Eyes from the list. If not selected it will not allow the user to get online. (Note: The option “Uninstall Covenant Eyes” is also in the Other category. We recommend leaving this option unchecked so that the user does not have access to uninstall the Covenant Eyes software.)
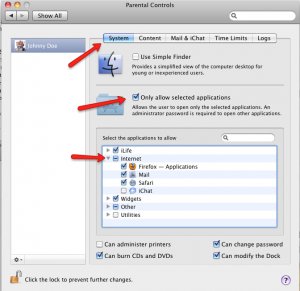 Step 6 - Modify system preferences for this user.
-
Once you have completed your selections on the System tab, click on the Content tab for more options. At the top of this section you’ll have the choice of activating the portion of the filter that prevents access to profanity in the Mac Dictionary. By checking the box next to “Hide profanity in Dictionary,” you will limit access to profanity in dictionaries, thesauruses, Wikipedia, and other sources.
-
In the Website Restrictions section, you have three filtering options:
- Allow unrestricted access to websites – As the name implies, this setting will not filter any websites.
- Try to limit access to adult websites automatically – Your Mac will automatically filter certain sites. The Administrator of the account can also add a list of sites that are allowed or blocked by clicking Customize.
- Allow access to only these websites – This option prevents the user from accessing sites other than those you choose and list here. To add sites to the list, click the plus sign (+) under the list. The list does come pre-loaded with several suggested fun and educational sites.
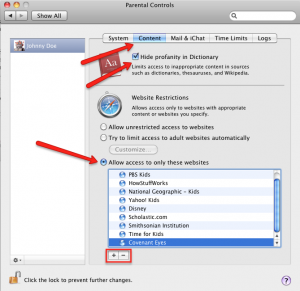 Step 8 - Choose how much you want to restrict the user's Internet access
-
On the “Mail & iChat” tab, you can place a limit on chat and e-mail exchanges to the list of addresses you create on this page. The addresses on this list are the only ones that will be allowed to send messages to the account user using Mac mail and iChat. You can add e-mail addresses by clicking on the (+) button. You can also request an e-mail any time someone not on this list attempts to e-mail the user.
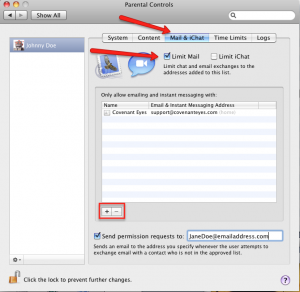 Step 9 - Restrict the people who can contact this Mac user through Mac mail and iChat
-
Under “Time Limits,” you can set the amount of time that a particular user is allowed to access the computer. In the first two sections, you can set the total amount of time the user is allowed to use the computer (between 30 minutes and 8 hours) on weekdays and weeknights. In the last section, you can set specific times the user is NOT allowed to access the computer. (Note: If you do not make a selection, system users will be allowed unlimited time.)
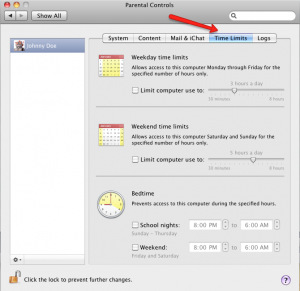 Step 10 - Select when and for how long the user is allowed to access the computer
-
Finally, by clicking on the “Logs” tab, the administrator can view activity logs in four areas: Websites Visited, Websites Blocked, Applications, and iChat. By selecting a time period in the Show activity for field, you can view logs from one day to one year and beyond. The Group by field allows you to sort the information for easier reading.
-
Once you have completed your modifications to the Parental Control Preferences, you will need to make sure you click back on the lock in the lower left. After it has closed, no one will be allowed to make changes without proper authorization.
Web Chaver Inc. is a New Jersey Tax Exempt 501(c)3 Organization. Use of this website signifies your agreement to the Terms of Use and Online Privacy Policy.